
DIY craft-stick Christmas tree advent calendar with “origami” boxes

I was given a box of 1,000 craft sticks, and I had no idea what to do with them. I wasn’t about to start building 1980s Popsicle stick jewelry boxes. I eventually came up with some Christmas ideas. This is my first craft stick project. Click here for my giant craft-stick snowflakes. (This post contains affiliate links. If you use these links to buy something, I may earn a small commission. You can read my full disclosure here.)
This advent calendar tree is easy but time consuming. I suggest you enlist some helpers to fold the “origami” boxes and tie ribbons and string. Technically, the boxes aren’t origami because they involve a few cuts, but they are assembled without tape or glue. Each box holds a piece of chocolate, candy, or tiny toy. The beauty is, you don’t have to remove the ribbon to open each box, so the calendar is reusable.
How to make a craft stick advent calendar with “origami” boxes
SUPPLIES & TOOLS
BOX INSTRUCTIONS

1. For the boxes, you will need 50 4×4-inch sheets of paper with diagonal lines drawn through the center. Either use a ruler to measure and draw the lines yourself, or download and print this template onto 25 sheets of letter size paper. (Part of the lines on the template are outside of the printable area. Don’t worry about this. It was necessary to save you two extra cuts on each sheet.) Cut along the solid lines of the template. I used Hammermill 32 lb. color laser gloss paper because it’s what I had on hand. I recommend it because it’s a good weight, durable, and resists fingerprints.

2. Fold each of the four corners into the center and open back up again.

3. Then fold each corner diagonally so the tip touches the center of the opposite fold, then open back up again.

4. Cut (as shown) along four of the folds, stopping at the center square.

5. Fold two opposites sides into the center again (as shown).

6. Fold again along previous folds to form two sides of the box (as shown).

7. Tuck the top and bottom pieces over and inside the box.

8. This is either the top or bottom of your box. Repeat steps 5-10 for each box top/bottom (50 times). Told you this was time consuming.

9. Slide one box bottom/top into the other. You’ll need to pinch in the sides the first time to make it fit.

10. Each box will look like this when you are done.

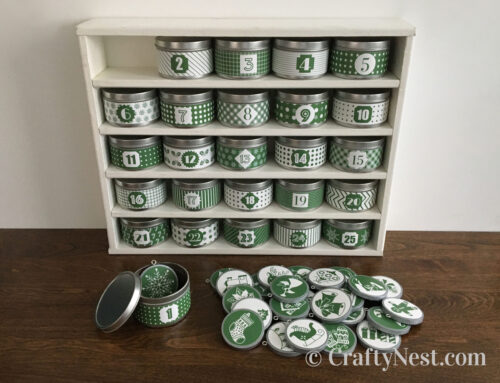
11. I couldn’t find any packages of just number stickers, so I bought packages of alphabet/number stickers. Three packets gave me just enough numbers (I was one short “1” sticker but I changed an “I” into a “1.” I couldn’t find red stickers, so I bought white ones and colored them red with a Sharpie marker. If you color your stickers, let the ink dry before peeling and sticking them on the boxes.

12. Tie a bunch of little nooses out of the red twine, then tie one noose to each box with a red ribbon bow.

13. Apply a small dot of hot glue under the knot of the bow and the string. This will keep the bow and string in place.

14. Hang each box by the twine noose.

15. Place a treat inside each box. Dove Promises (one of my favorites) fit nicely.
TREE INSTRUCTIONS

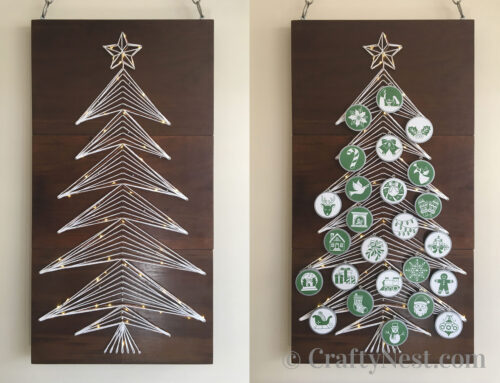
1. Glue craft sticks together end-to-end, overlapping about ½-inch in the following lengths: 6, 5, 4, 3, and 2. A trick to keeping each of them straight is to turn them sideways against the table while the glue cools. Then glue four sticks together in the center in a star shape.

2. Glue the “branches” of graduating lengths at each intersection along the longest strip of craft sticks, then glue the star to the top.

3. Paint the tree and star any color you want. Or leave them natural wood. (If you plan to paint the star a different color than the tree, it’s easier to paint the star before gluing it to the tree.) Hot glue rhinestones to each tip and center of the star.

4. Hang the boxes on the Christmas tree. Because there are an odd number of boxes and an even number of spaces, you’ll have to choose one branch that has one fewer boxes on it than the other.

5. Stick the tree to your wall with a small piece of double-sided foam tape at the top and bottom of the tree.

Share this story
Reader Gallery
Made this project? Email your photo(s) to monica (at) craftynest (dot) com, and I’ll share your version here!

Leave A Comment