
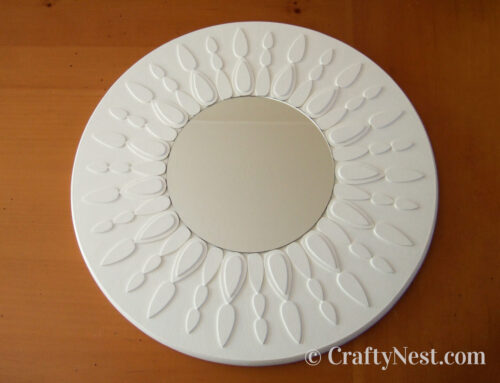
DIY starburst mirror

I am sorry for the suspense regarding my toolbox dresser project. I haven’t made much progress on it yet. In the meantime, I decided to make a starburst mirror. This project was a cinch because I learned from the mistakes I made on my sunburst mirror. The basic materials for this one: an Ikea plant glide (which I also used for my furniture-nail clock), wooden plant markers, and wooden skewers. Update: My toolbox dresser is done. Check it out here.
How to make starburst mirror
SUPPLIES
TOOLS
INSTRUCTIONS

1. Trace the mirror onto the Con-Tact paper. Cut out the circle, peel the backing, and adhere to the front of the mirror. This will protect the mirror from spray paint later.

2. Glue the mirror onto the plant glide, making sure it’s centered (about 2 ¼ inches from the edges). Set aside to let the glue dry.

3. Using the wire cutters, cut about two inches off of the flat end of the skewers, so each skewer is about eight inches long.

4. Lightly sand the rough edges of all the plant markers and skewers. Wipe off the dust with a tack cloth.

5. Arrange your pattern around the mirror. Use the books to prop up the plant markers and skewers.

6. Remove a plant marker or skewer one at a time and apply glue to about two inches of the end of it. Spread the glue with a paint brush. Adhere the piece back in place, then move on to the next one. Make sure the starbursts point directly away from the mirror. Pull the books away as you progress.

7. After all the plant markers and skewers are glued on, remove any excess glue from between the pieces by scraping with a toothpick.

8. When the glue is dry, flip the mirror over and arrange your pattern on the back. Evenly space out the skewers then fill in with the plant markers. Apply the glue the same as you did in step 6.

9. When all the pieces are glued down, let dry about an hour. Notice my pieces are not perfectly symmetrical with the front. I did this to give the pattern a more random feel.

10. Attach a sawtooth picture hanger on the back of the mirror.

11. Spray the mirror with several coats of paint to make sure the entire surface is covered. Let dry 15 minutes after each coat.

12. When the paint is completely dry, peel off the Con-Tact paper.

13. Hammer a nail into the wall, and hang the mirror.

Share this story
Reader Gallery
Made this project? Email your photo(s) to monica (at) craftynest (dot) com, and I’ll share your version here!


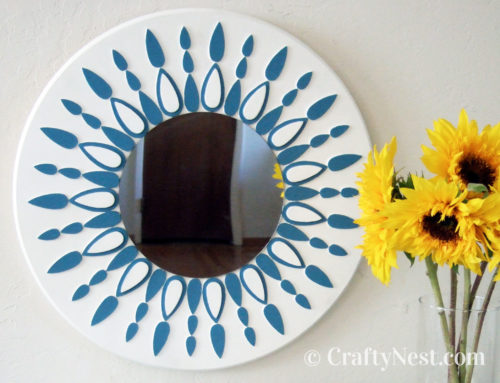
Sara Manly used a 14-inch mirror, larger plant stakes, and round skewers (which is all she could find). She also cut a large plywood circle with a jig saw instead of using a plant glide. Sara plans to make other versions including a sunflower with wooden petal shapes, and a sunburst with decorative molding strips. They sound like great ideas to me.

Leave A Comment