
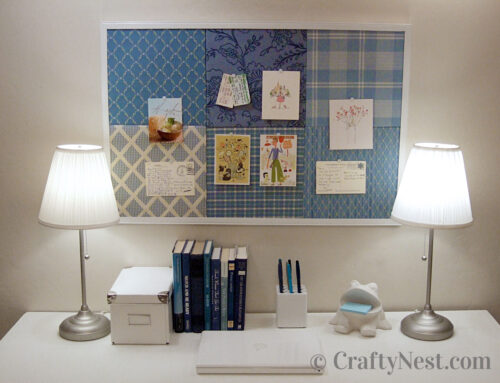
DIY bulletin board with shutters

I found these shutters at a salvage yard. I loved their shape, but couldn’t decide what to do with them. Then it occurred to me that shutters were the perfect way to cover a bulletin board (which can look messy). It hangs right inside my entry — a great place for a message center — and I close the shutters whenever I want to hide the clutter. My favorite part: using red furniture nails as thumbtacks. Also known as upholstery tacks, they come in many sizes and colors. (This post contains affiliate links. If you use these links to buy something, I may earn a small commission. You can read my full disclosure here.)


How to make a bulletin board with shutters
SUPPLIES
TOOLS
INSTRUCTIONS

1. Measure your shutters to determine how big to make your bulletin board frame. Measure the wood (twice!) and cut each piece. Because the wood is small, I cut it with a pull saw and miter box.
2. Lightly sand each piece. I also sanded the edges off diagonally to match the style of the shutters.

3. Use a corner clamp to hold each corner in place while you assemble the frame with screws.

4. Drill a pilot hole, then use a 5/16-inch bit to counter-sink the screw. Drive in the screw, then fill the hole with wood filler. When dry, sand the wood filler smooth.

5. Cut the homasote board to size. Cut your fabric a few inches larger than the board all the way around. Starting at one side, staple the fabric to the back of the board. Stretch tight, and staple the opposite side. Repeat for the other two sides. Staple the corners last.
6. Prime and paint the frame and shutters. I used paint and paint brush, which I do not recommend. Even going slowly and working with a fairly dry brush, it was impossible to control all the drips on each of the louvers. Spray paint would have been much easier and faster.

7. When the paint is dry, push the fabric-covered board through the back of the frame. It should fit very snugly. Turn it over and lie flat. Press the board back so it will sit flat against the wall when hung.
8. Attach keyhole fasteners to each of the top corners. Make sure they are facing the right way. I inserted washers under each fastener to give a little extra space underneath for the screw head to fit.

9. Attach two hinges to each shutter. Drill pilot holes first. Then attach shutters to the frame.

10. Install cabinet door catches at the top to keep the doors closed.

11. Attach small drawer pulls wherever you wish. (I found these knobs at a salvage yard.)
12. Measure the distance between the keyhole fasteners. Find the studs in your wall (by knocking or using a stud sensor), and drill drywall screws into the studs (or use a drywall anchor or molly bolt). Be sure you use a level and measure correctly before drilling. Hang the bulletin board on the wall.

13. Hang up your miscellany using furniture nails. Put the spares in a bag tacked to the board. It should fit behind the shutters.

Share this story
Reader Gallery
Made this project? Email your photo(s) to monica (at) craftynest (dot) com, and I’ll share your version here!

Leave A Comment